This is part 2 of a 3-part post on setting up a parents evening appointment system. Part 1 looked at setting up the documents and in particular the pre-filled form links. Here, we’re going to look at the code which will create the forms for each class and which will create appointment list sheets for each one. In summary, we’re going to:
- Set up a menu to run the code from
- Get the groups from the formLinks sheet
- Loop down that list to make the forms for each class
- Add the links to the formLinks sheet
- Add the form responses sheets to the spreadsheet
- Add an a appointment list sheet for each group
- Get the class details and add them to the appointment list
- Set up an onFormSubmit trigger
The Code
Setting up a menu
To save having to open the Script Editor to run the code, let’s create a menu to run the code from.
1. function onOpen() {
2.   const ui = SpreadsheetApp.getUi();
3.   ui.createMenu('Admin')
4.     .addItem('Set up forms & sheets', 'setUpForms')
5.     .addToUi();
6. }
Line 1: Set up an onOpen() function so that the menu appears when the spreadsheet is opened.
Line 2: Get the spreadsheet UI, as we’ll need this to add the menu to it.
Line 3: First, create the title of the menu. Here, I’ve called it ‘Admin’. Note, there is no semi-colon at the end as we’re going to add the menu items to it.
Line 4: Use addItem() to add the menu item. Here, the menu will show ‘Set up forms & sheets’ and will run the function called ‘setUpForms’.
Lines 5 & 6: Finally, we add it all to the spreadsheet UI and close the function.
Setting up the forms and sheets
This is the function that will set up the forms and sheets for each class group.
8. function setUpForms() {
9.   //Folder to store forms in - Add your own folder ID here
10.   const formFolder = DriveApp.getFolderById('1iYRITqL3JhKtIzXNlVVzFx1WAgbWW38T');
11.
12.   //Get master form IDs (Add your own IDs here)
13.   const formMaster1615 = DriveApp.getFileById('1CA6lrD5ABPNW1WChaeuyfmPfh0Wlo5lhdNRCLamE3Cs');
14.   const formMaster1745 = DriveApp.getFileById('1Gqf_rcq4NtA4GvUXkPfPYOSbnwvLn3EzQbZECe_WxeE');
15.
Line 8: Set up the function.
Line 10: I usually like to store all the forms in their own folder. So, here we use getFolderById() to state which folder we’re going to use. Add your own folder ID here. Then we store it in the variable formFolder for later use.
Lines 13 & 14: To make the forms, we’re going to use 2 master forms already made. One is for the 16:15 block and one is for the 17:45 block. We get their IDs. Again add your own form IDs here.
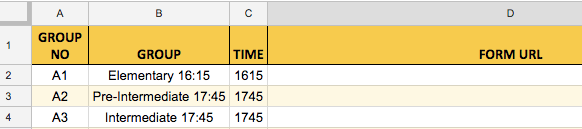
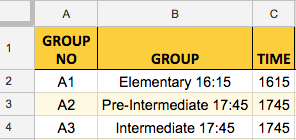
Now, let’s get the data from the formLinks sheet. This is the sheet with the list of class groups and where we will add the form URLs for each group.
16.  //Get formLinks sheet and data
17.  const ss = SpreadsheetApp.getActiveSpreadsheet();
18.  const ssId = ss.getId();
19.  const shFormLinks = ss.getSheetByName("formLinks");
20.  const [flHeader, ...flData] = shFormLinks.getDataRange().getValues();
21.
Line 17: Get the active spreadsheet.
Line 18: Then get its ID and store it in the variable ssId.
Line 19: Get the sheet called ‘formLinks’.
Line 20: Get all the values on the formLinks sheet using getDataRange(). Getting it all in one go, will reduce the number of calls to the spreadsheet and speed up the process a little. We can “destructure” it which means we can assign a variable to the header data and a variable to the rest of the data. This will enable us to remove the header row from the main data. So, the header row data is stored in flHeader, and the rest of the data in flData. Note, we’ve used the spread operator (…) on flData, to grab all the data.
Now, let’s get the other sheets and in particular, the data on the ‘students’ sheet and the ‘master’ appointment sheet.

22.  //Get the data on the students sheet
23.  const shStudents = ss.getSheetByName("students");
24.  const [studentsHeader, ...studentData] = shStudents.getDataRange().getValues();
Line 23: Get the sheet called ‘students’.
Line 24: Get all the data on that sheet and store it in studentData. Again, I’ve destructured the array like we saw above to again extract the header from the data.
Now, let’s make the forms for each group. For each group we need to use either the 16:15 or 17:45 master form based on the times stated in the formLinks sheet.
26.  //Loop down groups and make copy of & rename either 1615 or 1745 form
27.  for (rw in flData) {
28.    //Get group info from formLinks sheet and into variables
29.    let [groupNo, group, time] = flData[rw];
Line 27: We’re going to loop through the flData array, which will go through all the groups stored in that array. I’ve used the variable rw to count through the array. A for in loop will start at 0 and continue to the end of the array, unless otherwise forced out of the loop.
Line 29: Now let’s extract the 3 pieces of data we’re going to use from the formLinks sheet: group number, group name, and the class start time. We do this by destructuring the current row in the flData array and store the data in the 3 variables, groupNo, group, and time.
31.    time = time.toString();
32.    let newForm;
33.    if (time === "1615") {
34.      newForm = formMaster1615.makeCopy(groupNo + "-" + group, formFolder);
35.    }
36.    else if (time === "1745") {
37.      newForm = formMaster1745.makeCopy(groupNo + "-" + group, formFolder);
38.    }
Line 31: We need to convert the time variable to a string as on the sheet it’s a number and the check below will check to see if it equals a string.
Line 32: Set up the newForm variable, which will store the appropriate form.
Line 33: Here, we’re going to check if the time in column C is equal to ‘1615’, so we use an if statement to check that.
Line 34: If it is, then we make a copy of the 16:15 form master. In the brackets we state the name of the newly-created form and state where it will be stored. For mine, I’m getting the group code (groupNo) and the group name (group). So, it will be named something like “A1-Elementary 16:15″. We state the folder it’s going to be stored in by using the formFolder variable we set up earlier on. To work with the form, we store it in the variable newForm.
Line 35: Close the if statement.
Lines 36-38: Then, we use an else if statement to deal with the other alternative. Then, we do exactly the same, except we get the 17:45 master form. Then, close the else if statement.
Now, we need to get the newly-created form, get its published URL, add that to the formLinks sheet and then add the form responses sheet to the spreadsheet.
40.    //Add form URL to formLinks sheet & form to spreadsheet
41.    let newFormId = newForm.getId();
42.    let openNewForm = FormApp.openById(newFormId);
43.    let newFormUrl = openNewForm.getPublishedUrl();
Line 41: Get the ID of the new form.
Line 42: Open the new form using the ID.
Line 43: Get the published URL, which is the one which people use to fill in the form.
45.    shFormLinks.getRange(Number(rw) + 2, 4).setValue(newFormUrl);
46.    openNewForm.setDestination(FormApp.DestinationType.SPREADSHEET, ssId);
47.    SpreadsheetApp.flush();
Line 45: We want to add that URL to the formLinks sheet. Get the sheet and the range we’ll use the rw variable to know which row we’re currently on.
Note that, as we have been working in an array, rw for the first row will be 0 (remember we got rid of the header row), but on our sheet the first group is actually on row 2. So, as getRange() works with the rows and columns on the sheet, we need to add 2 to our rw value. We also need to convert it into a number, hence why we have Number(rw)+2. We want to add the URL to column D, so we state 4. Then we set its value to the URL.
Line 46: To link the form to the sheet and add the form responses sheet, we get the (opened) form and use setDestination(). This contains 2 parts: the destination type and the spreadsheet ID. So, we use state its a spreadsheet and we use the spreadsheet ID in ssId we obtained earlier.
Line 47: We need to update the spreadsheet with all the changes so far, otherwise it won’t recognise that a form responses sheet has been added and will cause an error. To do this, we use the flush() method.
Now, let’s rename and move the form responses sheet.
49.    //Rename form response sheet
50.    let sheets = ss.getSheets();
51.    let newFRSheet = sheets[0];
52.    newFRSheet.setName("F" + groupNo);
Line 50: First, we get all the sheets in the spreadsheet and store them in the sheets array.
Line 51: Then, as the form responses sheet is always added on the left, i.e. in position 0, we can get that sheet by getting position 0 in the sheets array.
Line 52: Then, we set its name. Here, I’m naming it with the group code and adding an ‘F’ at the start. So, for example the first time around the loop, so will name the first form responses sheet “FA1”.
54.    //Move sheet to the right
55.    ss.setActiveSheet(newFRSheet);
56.    ss.moveActiveSheet(sheets.length);
Line 55: Make the form responses sheet active so we can move it.
Line 56: I want to move it to the right, so we can do this by getting the length of the sheets array and moving it to that position, i.e. at the end. This allows the ‘students’ and ‘formLinks’ sheets to always be on the left and easy to find.
Now, let’s set up the appointment sheets with the group details.
Now, I want to get the rest of the group details, which are stored on the ‘students’ sheet. Here, we’ll have to find the group number and that from that row get the other details.
58.    //Set up APPOINTMENT SHEETS
59.    //Loop down student list looking for group no
60.    let date, teacher, room;
61.    for (s in studentData) {
62.      let sd = studentData[s];
63.      if (sd[0] === groupNo) {
64.        date = sd[7];
65.        teacher = sd[4];
66.        room = sd[6];
67.        break;
68.      }
69.    }
Line 60: Set up the variables to store the date, teacher, and room from the students sheet. We need to set them up outside the loop, as we’re going to use them later in the code, and so they need to be set up like this so they are visible outside the loop.
Line 61: Set up a for in loop using the studentData array created earlier and we’ll use the variable s to count through it.
Line 62: To save typing studentData[s] multiple times below, let’s store it in a variable called sd.
Line 63: Use an if statement to check if the group code in the studentsData array (column A on ‘students’ sheet) is equal to the group code of the current group.
Lines 64-66: If it matches, we get the date, teacher, and room from the studentsData array, using positions 7, 4, and 6 respectively (columns H, E, G).
Line 67: If a match has been found, break out of the loop, to save it continuing needlessly all the way to the end.
Lines 68-69: Close the if statement and for in loop.
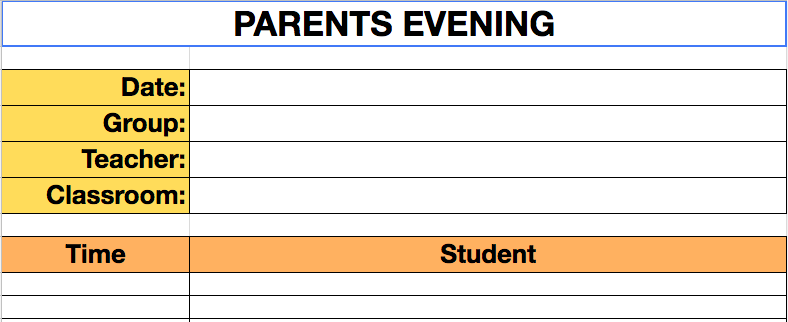
Now, we’re going to make a copy of the master appointment sheet and add the group details to it.
71.    //Create group appointment sheet, rename & add group details
72.    const shMaster = ss.getSheetByName("master");
73.    shMaster.showSheet();
74.    let newAppSheet = shMaster.copyTo(ss);
75.    newAppSheet.setName(groupNo);
76.    let details = [[date], [group], [teacher], [room]];
77.    newAppSheet.getRange("B3:B6").setValues(details);
78.  };
79.  shMaster.hideSheet();
Lines 72-73: Get the master sheet and then as I normally keep master sheets hidden, we’ll need to show it, so that the copy will be visible.
Line 74: Add a copy of the master sheet by using copyTo() and passing the spreadsheet in the brackets. This will add the copy to the right of the sheets, so there’s no need to move it.
Line 75: Change its name to the group number.
Line 76: Instead of adding the details one by one to the new appointment sheet, we can do it all at once by placing them in an array. This reduces the number of calls and speeds up the process. We’re going to add them to 4 different rows, so each variable needs to be in its own set of square brackets, then with the whole thing in another set.
Line 77: We get the range we want and add the contents of the details array to it.
Lines 78-79: Close the original for in loop and hide the appointment master sheet.
This will do the same for each of the groups as it loops down the list of groups on the ‘formsList’ sheet.
The final thing to set up is a onFormSubmit trigger, so the appointment sheets, etc will populate when the parents submit the forms.
81.  // Create new trigger
82.  ScriptApp.newTrigger("onFormSubmit")
83.    .forSpreadsheet(ss).onFormSubmit().create();
Line 82: Set up the new trigger and in the brackets state the function name that will be run. To keep things simple, I often call the function that is triggered by an onFormSubmit trigger “onFormSubmit”, but you can name it what you like.
Line 83: Link it to this spreadsheet ‘ss‘, state the trigger type, and create it.
85.  ss.toast("Forms and sheets set up.");
86. }
Line 85: Just to tell the user that the process is finished, here we have a simple toast message that will appear once the code has finished.
Line 86: Close the function.
Run the code, authorise it and you will see that it has created the form response sheets (purple) and the appointment sheets (orange).

You can make a copy of the spreadsheet here.
You can find the whole piece of code here on GitHub.
Now, you’ve set the sheet and forms up, it’s time to write the code which will deal with the form submissions and book the appointments. That’s all detailed in part 3.
Want to learn more about Google Workspace and Apps Script? The books below are available on Amazon. Just click on a book! (Affiliate links).


a


I cannot find Part 1, Baz. Can you please relink it?
Thanks very much,
Brian
Hi Brian, I’ve fixed the link at the top of the part 2 sheet, to the part 1. Thanks for letting me know!