In this final part of a 3-part post (see part 1 and part 2), we’re going to look at how we get the parents form submissions, send them a confirmation email with the appointment details, and record the appointment on the appointment list for the teacher.
The main steps are:
- Get the form responses.
- Get the list of groups on the formLinks page.
- Get the formURL
- Get the current appointments on the form
- Remove the latest submitted appointment and update the form.
- If it’s the first submission for that group, add a QUERY function to collect future submissions on the appointment sheet.
- Send an email to the parent with the confirmation details of the appointment.
- Check to see if the daily quota has been exceeded and if so, store the details on the ‘toEmail’ sheet.
The Code
Getting the latest form submission
As the spreadsheet will contain several form response sheets, we first need to get the form responses sheet with the latest submission and then get the last row on that sheet.
1. function onFormSubmit(e) {
2.   //Get appointment & corresponding group from latest form submission
3.   const ss = SpreadsheetApp.getActiveSpreadsheet();
4.   const sheetName = e.range.getSheet().getName();
5.   const shResponses = ss.getSheetByName(sheetName);
6.   const lastRow = shResponses.getLastRow();
Line 1: Set up a onFormSubmit function and include in the brackets ‘e’ to capture the event (i.e the form submission).
Line 3: Get the active spreadsheet.
Line 4: We use the e event to then get the sheet and its name.
Line 5: We can then get that sheet by its name.
Line 6: We’re only interested in the latest submission, which will be on the last row.
8.   //Get latest form submission and assign values to variables
9.   const submission = shResponses.getRange(lastRow, 1, 1, 9).getValues()[0];
Line 9: Get the values of the last row.
Then, we need to get the form and the current appointments on it.
Updating the appointment times
11.  //Get current appointments array from Form
12.  const formUrl = shResponses.getFormUrl();
13.  const form = FormApp.openByUrl(formUrl);
14.  const items = form.getItems();
15.  const formClassList = items[6].asMultipleChoiceItem();
16.  const choices = formClassList.getChoices();
17.  let timesArray = [];
18.  for (ch in choices) {
19.    timesArray.push(choices[ch].getValue());
20.  }
Line 12: We get the form URL connected to that sheet, using getFormUrl().
Line 13: Open the form by its URL.
Line 14: Get all the items on that form.
Line 15: The question with the appointment times, is the 7th item, so is position 6 in the items array. Get it as a multiple choice item.
Line 16: Get the current choices, i.e. the times.
Line 17: Set up an empty array, where we’re going to store those times.
Line 18: We use a for in loop to loop through those times.
Lines 19-20: We push one by one the times in that array into the timesArray. Note, we need to get the value of the choices, before pushing them in, i.e. the actual times. Then close the loop.
Now, we have an array of the current appointment times left, we need to find the latest one submitted and then remove it from that array.
22.  //Remove latest submitted time from array
23.  for (cc in timesArray) {
24.    let time = submission[7];
25.    if (timesArray[cc] === time) {
26.      let indexApp = timesArray.indexOf(time);
27.      timesArray.splice(indexApp, 1);
28.    }
29.  }
Line 23: We use another for in loop to loop through the array looking for the submitted time.
Line 24: Use an if statement to look for a match between the time in the array and the submitted time.
Line 25: When a match is found we need to get its index to so we know which element to remove. We do that using the indexOf() method. Then we store it in the variable indexApp.
Line 26: We then remove that time from timesArray using the splice() method. We use the index to determine the position and we’re removing one element.
Lines 27-28: Close the if statement and loop.
31.  //Update Form with times left
32.  formClassList.setChoiceValues(timesArray);
Line 31: We then update the form with the updated times array, by using setChoiceValues(). The form now doesn’t contain the time that was just submitted.
Add appointment to appointments page
The next part is to set up the appointment sheet, so that it will automatically populate as further submissions come in. To do that we add a QUERY function, which will look at that particular form responses sheet and add any submissions onto the appointment sheet.
34.  //Set QUERY formula if it's the first submission
35.  if (lastRow === 2) {
36.    ss.getSheetByName(groupNo).getRange("A9")
37.      .setFormula("=IFERROR(QUERY('" + sheetName +
38.        "'!A2:I60;\"select H, B where G='\"&$B3&\"' order by H asc\");\"Error\")");
39.  }
Line 35: We only need to add this formula the first time we get a form submission from that particular form, so we only run it when the last row on the form responses sheet is row 2, i.e. the first submission.
Line 36: If it is, we get the corresponding sheet and the cell A9.
Lines 37-38: Then we add the QUERY formula. I won’t go into the details of how this works here, but basically, it looks at the form responses sheet, gets the rows down to row 60, then selects the data in columns, H and B (appointment time and student’s name) and puts the appointments in time order.
Line 39: Close the if statement.
Sending the confirmation email
We then need to set up the confirmation email.
41.  //Send confirmation email
42.  sendEmail(submission);
43. }
Lines 42-43: Call the sendEmail function and pass the submission variable and close the current function.
45. function sendEmail(submission) {
46.  //Get individual data from submission - ignore first column
47.  const [, student, group, teacher, building, classroom, date, time, email] = submission;
Line 45: Open the sendEmail function.
Line 47: Extract the data in the submission and assign it to different variables by deconstructing it.
49.  //Set up email
50.  let emailSubject = "APPOINTMENT CONFIRMATION - " + student;
Line 50: Set up the email subject line. Here, I’ve also added the name of the student.
52.  let emailBody = HtmlService.createTemplateFromFile('email')
53.    .evaluate().getContent();
54.  emailBody = emailBody.replace('#STUDENT#', student);
55.  emailBody = emailBody.replace('#GROUP#', group);
56.  emailBody = emailBody.replace('#DATE#', date);
57.  emailBody = emailBody.replace('#TIME#', time);
58.  emailBody = emailBody.replace('#BUILDING#', building);
59.  emailBody = emailBody.replace('#CLASSROOM#', classroom);
60.  emailBody = emailBody.replace('#TEACHER#', teacher);
Lines 52-53: We will have the email template stored in a HTML file called “email”. We use the HtmlService to get the content of that template.
Lines 54-60: In the email template, I’ve set up placeholders, which we will use to add the data from the submission. An easy way to do that is to use the replace method, which looks for the first text in the brackets and replaces it with the second text or in this case variable, in the brackets.
The final part checks to see if the daily quota of emails sent has been exceeded or not. This is optional, but we used to use a Gmail account and we have about 400 students, so occasionally we reached the limit, hence why I added a way to catch it. If this isn’t a problem in your context, you can just use lines 64 to 66.
62.  //Send email or if you have received daily limit, register it on the toEmail sheet
63.  if (MailApp.getRemainingDailyQuota() > 0) {
64.    MailApp.sendEmail(email, emailSubject, emailBody, {
65.      htmlBody: emailBody, replyTo: 'bazrobertsbooks@gmail.com'
66.    });
67.  }
Line 63: Use an if statement to check if it’s still possible to send emails today. At the start of the day this will be 100, so anything over 0 is fine.
Lines 64-66: Send the email. Here we pass the email address, the email subject line, and the body, then in the curly brackets we can set some parameters. The htmlBody one is essential as we’re going to use a HTML email, whereas the replyTo one is optional, but I use it so replies go back to a certain person, not to the account sending the trigger.
If we can’t send any more emails today, then I’m going to store them on the toEmail sheet.
69.  else {
70.    const toEmailSheet = ss.getSheetByName("toEmail");
71.    const appDetails = [student, group, teacher, building, classroom, date, time, email];
72.    toEmailSheet.appendRow(appDetails);
73.  }
74. }
Line 69: Set up an else statement.
Line 70: Get the sheet called ‘toEmail’.
Line 71: Add all of the appointment details that will be included in the confirmation email into the appDetails array.
Line 72: Append this row to the toEmail sheet.
Lines 73-74: Close the else statement and close the function.
We can send the confirmation emails either on a different day or with a different account.
Setting up the email template
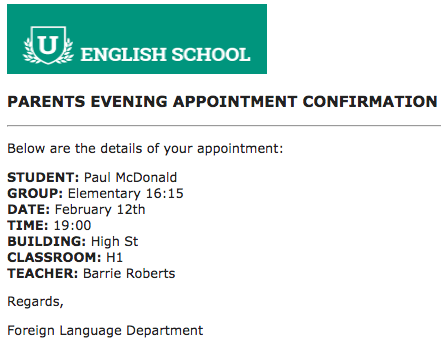
In this final part, we’ll look at the email template. This is an example of what the parents will receive:
1. <!DOCTYPE html>
2. <html>
3.
4. <head>
5.   <base target="_top">
6.   <style>
7.     p, h3 {
8.       font-family: verdana, Helvetica, sans-serif;
9.     }
10.   </style>
11. </head>
Lines 1-5: Leave the default html in the file.
Line 6: Add a style tag.
Lines 7-9: Here we’re just going to set the font for the paragraphs and the header with a little bit of CSS.
Lines 10-11: Close the style and head tags.
13. <body>
14. <img src="https://docs.google.com/uc?id=14lNpZR6SS6ZOHQlzq_E2HbdsbhP0jNVb" height='70' width='260'>
15.  <h3>PARENTS EVENING APPOINTMENT CONFIRMATION</h3>
16.  <hr>
17.  <p>Below are the details of your appointment:</p>
18.  <p><strong>STUDENT: </strong>#STUDENT#</p>
19.  <p><strong>GROUP: </strong>#GROUP#</p>
20.  <p><strong>DATE: </strong>#DATE#</p>
21.  <p><strong>TIME: </strong>#TIME#</p>
22.  <p><strong>BUILDING: </strong>#BUILDING#</p>
23.  <p><strong>CLASSROOM: </strong>#CLASSROOM#</p>
24.  <p><strong>TEACHER: </strong>#TEACHER#</p>
26.  <p>Regards,</p>
27.  <p>Foreign Language Department</p>
28.
29. </body>
30.
31. </html>
Line 13: Open the body tag.
Line 14: To make the email a little more professional, I’ve added the school logo, which is stored on my Drive. For others to see it, make sure it’s shared with anyone on the internet.
Line 15: Add a header.
Line 16: Add a horizontal line.
Lines 17-27: Add the paragraphs. I’ve used the strong tag to add the words on the left in bold. The words with the the hashtags are teh placeholders we’re going to replace.
Lines 29-31: Close the body and HTML tags.
Once the system is all set up, the next step will be to email the parents with the links to the forms. We used to use the excellent add-on called “Yet Another Mail Merge“. Prior to running it you will need to set up a draft Gmail message, in which you will need to include the tag <<Sign up link>> which will tell the add-on to add the link you’ve created for each student. Alternatively, you could write another piece of code for sending the invites out, something similar to the confirmation email code, you’ve seen above, that’s what we use now.
When the parent submits the form, the appointment details are stored in the form responses sheet.

And then is recorded on the class’s appointment sheet:

The parents receive an email with the details of the appointment:
Hopefully, you’ve found this useful, not only to make an appointment system but to see how the forms and sheets can work together, and to see how formulas, functions, and Apps Script all work hand-in-hand.
You can make a copy of the spreadsheet here.
The full code for this project is on GitHub here. (This includes part 2 and part 3).
Want to learn more about Google Workspace and Apps Script? The books below are available on Amazon. Just click on a book! (Affiliate links).


a


